Types of Phishing Attacks
A cyberscammer will use a variety of tactics and ploys to disguise themself as trustworthy in an effort to gain access to information. As technologies evolve, so does the scammer’s ability to influence your decision about their trustworthiness. Phishing is a common attack method used by scammers.

There are different types of phishing attacks:
- Email phishing: an attacker masquerades as someone you may know or a company with whom you interact for business purposes. Hyperlinks are embedded in their message with the hope that you will click and be taken to a nefarious website.
- Malware phishing: An attachment is added to an email message that, when opened, will infect your computer with malware or a virus.
- Spear phishing: Customized email messages target specific individuals with malware-infected attachments or hyperlinks to malware-infected websites.
- Whaling: Similar to spear phishing, scammers use customized email messages that are purportedly sent from an executive to their direct contacts. Their hope is to attract executive level leadership into divulging important business information.
- Smishing: This is a form of phishing that uses text messages instead of email messages. While the communication medium may be different, the intent is the same: steal information from an individual.
- Vishing: Fraudulent call centers attempt to trick individuals into providing sensitive information over the phone.

Common Tactics:
- Skilled communication: the message, whether it is an email, text or voice, appears legitimate and is intended to manipulate the intended recipient.
- Perceived need: The intended victim feels the need to quickly act because of an urgent need.
- Trust: Scammers attempt to create trust with the intended victim by impersonating a trustworthy source.
What are the common errors that indicate the source cannot be trusted?
- The display name or email address does not match who they are purporting to impersonate.
- Typos
- The hyperlink does not match the link text.
If you feel you have become the victim of a phishing attack, please contact one of the IT Support Specialists in OSU Agriculture IT.
For more information:
Computer Viruses and Malware: Cybersecurity Awareness Month 2022
 Computer viruses and Malware
Most people who use computers have heard the terms “malware” and “computer viruses”, but what are they? Malware and computer viruses are usually used synonymously but while it’s true that all viruses are malware, not all malware is a computer virus. Malware, short for malicious software, refers to software that is made to be malicious. Popular types of malware include:
- Phishing: a term used for email messages designed to look legitimate in the hopes of leading you to a fake website or opening a file that may harm your computer, encrypt your data or steal your information. This is one of the most common and frequent forms of malware which makes it especially dangerous. For more information, see https://it.okstate.edu/security-education/phishing.html
- Network sharing: a computer on a network becomes infected and spreads the infection to other computers on the network.
- Trojan: software designed to look identically like other, genuine software that, when activated, allows outside access and control of a device. Some trojans damage the device, either the software or hardware; some trojans steal data.
- Ransomware: software that locks then encrypts data and/or device. Payment is demanded in return for the encryption key to unlock the device/data.
- Adware and Spyware: software designed to push advertising. This software tracks activity through browser cookies and the browser’s history. The software will push pop-up ads and other unwanted advertising. Like other malware, adware/spyware can collect data that would be sold to other parties for identity theft and credit card fraud.
A computer virus is a type of malware that spreads as soon as it is ran on their device. It is attached to another file and spreads as soon as it is opened, either by the user or automatically by the computer. Symptoms of having a virus include:
- Unexpected behavior, such as extreme slowdowns and consistent crashes
- Missing or corrupted files
- Low Storage space on hard drive
- Constant and unexpected browser pop ups
- Unable to run software to check for viruses
- Unidentified programs or apps
Computer viruses can steal your data, send infected files to others on the contact list of the device or on the same network, and even take over other applications.
To keep your technology safe and minimize the risk of malware and computer viruses, use an anti-malware/anti-virus software application. The program acts as a gatekeeper on your computer and monitors and scans activity then notifies and takes action when necessary.
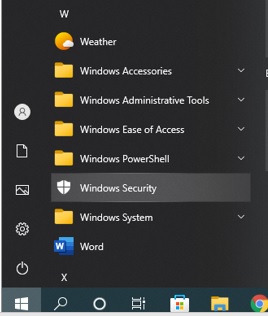
For Windows PCs, the Windows Security app, originally called the Windows Defender, is our go-to application. To access this app on a Windows 10 computer, select the Windows icon on the bottom left of your screen, and then scroll down to Windows Security, as shown in the below photo.
From the Windows Security window, select “Virus & Threat protection” (on the left hand side) then click on “Quick Scan”.
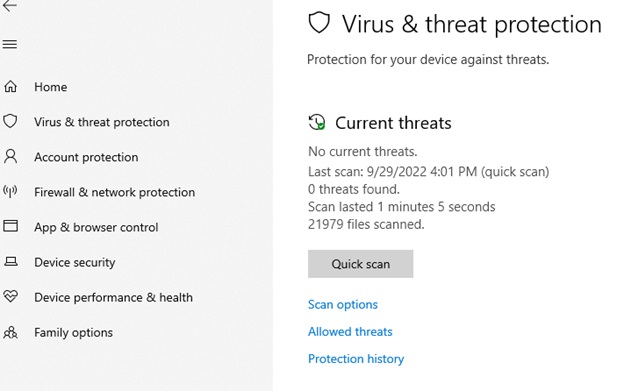
To run the full scan option, click on “Scan Options” as shown above and select the Full Scan option, then click “Scan Now”.
Apple computers has programs for malware protection: Gatekeeper, Xprotect, and MRT (Malware Removal Tool). All three applications should be automatically added and running on your iOS system. Microsoft Defender for Endpoint is also available for Mac at https://learn.microsoft.com/en-us/microsoft-365/security/defender-endpoint/microsoft-defender-endpoint-mac?view=o365-worldwide or the App store on your iPhone and Ipad.
Gatekeeper is the security system that checks the integrity and authorization of the software once it is downloaded. It also checks apps running in the background and may not be visible or immediately available.
Xprotect is set to track and block malware from running. You can verify the app is running: click on the Apple logo > About this Mac. Then go to System Report > Software > Installation.
MRT is a three part process that protects the device from malware, with the first layer intended to prevent the downloading of suspicious files, the second layer using XProtect to check apps for malware when they are about to start, and the third removes the malware.
Whether it is a PC, a Mac or a mobile device, the best way to protect your devices comes from prevention:
- Keep your device updated. Updates regularly include security features. It’s suggested that you check for new updates once a week.
- Be aware of suspicious emails. Emails designed to trick users are getting better at looking legitimate. They can imitate personal and corporation accounts and will usually include a hyperlink embedded in the message. When in doubt, use methods of checking that doesn’t include the information on the suspicious email, such as visiting the website in question or contact the person who supposedly sent the email. For more information, check a more in depth description at https://it.okstate.edu/security-education/malicious-emails.html
- Forward suspicious emails and report suspicious technological circumstances to abuse@okstate.edu.
If you receive a suspicious email or your device appears to have a virus or malware, contact your departmental IT Specialist!
Sources:
- https://www.titanfile.com/blog/types-of-computer-malware
- https://hightouchtechnologies.com/9-common-types-of-computer-viruses
- https://us.norton.com/blog/malware/types-of-malware
- https://iboysoft.com/wiki/xprotect-mac.html
FindTime
FindTime is a plugin for Outlook that assists in scheduling a meeting with expected attendees. Under OSU’s current licensing agreement, employees are able to freely install FindTime.

FindTime can be used with Outlook for Windows, Outlook for Mac, and Outlook on the web. Intended meeting attendees are not required to have the add-in installed to vote on meeting times and invitations can be sent to any email address.
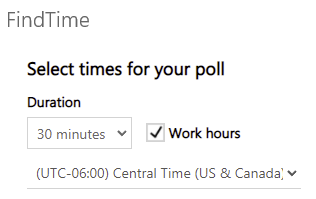
Note: if you use Outlook 2013 or 2016, or Outlook for Mac 2016 or 2019, you will be asked to sign in every time you create a FindTime poll.
Installation information is available at https://support.microsoft.com/en-us/office/install-findtime-2501ff38-0a47-4dc5-999f-bcca329f0f63
FindTime is intuitive. If you would like instructional materials for using FindTime see links at https://support.microsoft.com/en-us/topic/findtime-articles-ec8304aa-e2a2-4cca-ae4c-5d4d0b4b7dc5
Don’t Be Held Captive to Ransomware
“$5.9M ransomware attack on major agriculture group poses risk to US grain, pork, chicken supply”
Fox Business
Sept. 21, 2021
What is Ransomware?
Ransomware is a type of malicious attack where attackers encrypt a victim’s data. Ransom is then demanded in exchange for decryption. Hackers often target and threaten to sell or leak sensitive data or authentication information if the ransom is not paid.

Ransomware is big business! In terms of both ransoms paid, spending and lost time in recovering from attacks, an estimated cost to the global economy is approximately $20 billion in 2021, a 57-fold increase from 2015. It’s estimated that 45 percent of ransomware attacks target healthcare organizations while 85 percent of malware infections at healthcare organizations are ransomware.
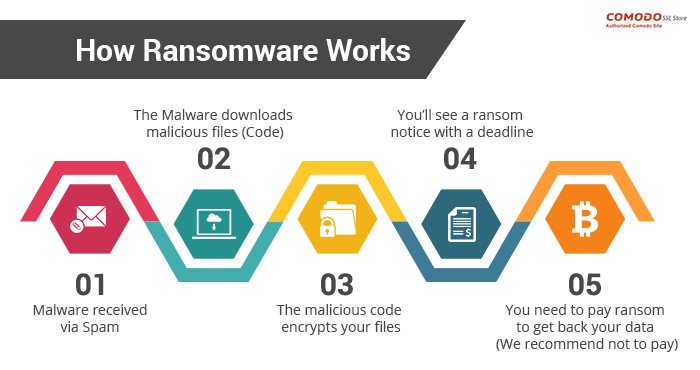
How ransomware works
One of the most common delivery mechanisms is phishing email: attachments accompany an email to the potential victim. Once the attachment is downloaded and opened the attack takes over the victim’s computer. Another common delivery mechanism is from malicious websites. An example of how this payload occurs:
- A user is tricked into clicking on a malicious link that downloads a file from an external website.
- The user opens the file, not knowing that the file is ransomware.
- The ransomware takes advantage of vulnerabilities in the user’s computer and uses other computers on the network to propagate throughout the organization.
- The ransomware simultaneously encrypts files on all vulnerable computers then displays messages on their screens demanding payment in exchange for decrypting the files.
At a minimum ransomware disrupts an organization’s operations; a worst case scenario is that ransomware halts an organization’s ability to do business. Ransomware poses a dilemma for an organization’s management: does the organization pay the ransom and hope that the attackers keep their word to restore access, or does the organization not pay the ransom and attempt to restore operations themselves? Payment of ransom does not guarantee a key to unlock the encrypted data and organizations may not be able to completely restore operations after an attack.
Minimizing the risks of a ransomware attack
Fortunately you can take steps to minimize the possibility of a ransomware attack and you can minimize the effects should an attack be successful. Best practices for managing the risk and preventing ransomware attacks include:
- Use strong passwords; use multifactor authentication whenever possible.
- Do not install unauthorized apps! Beware of opening files or clicking on links from unknown sources.
- Be suspicious of unexpected emails.
- Keep your computer updated! Both PC and Mac computers receive updates from Microsoft and Apple. You must enable the installation of these updates.
- Your computers must use antivirus software! Antivirus/antimalware software should automatically scan emails and flash drives. Contact your Computer Support Specialist about installing the enterprise licensed anti-malware software.
- Be prepared: backup your data and regularly test these backups. Create and exercise a basic cyber incident response plan that includes response and notification procedures for a ransomware incident.
- When connecting to a network, choose a secure network and use a virtual private network (VPN) where possible.
Plan for recovery
Steps to follow after ransomware has been detected:
- Determine which systems were impacted and immediately isolate them.
- Only in the event you are unable to disconnect devices from the network, power them down to avoid further spread of the ransomware infection.
- Contact the appropriate authorities.
Steps you can take now to help you plan for recovery from a ransomware attack:
- Develop and test a recovery plan, including an up-to-date list of internal and external contacts for ransomware attacks.
- Carefully plan, implement, and test a data backup and restoration strategy.
Links mentioned or referenced in this article
- https://csrc.nist.gov/projects/ransomware-protection-and-response
- https://www.cisa.gov/stopransomware/ransomware-101
- https://us-cert.cisa.gov/ncas/tips/ST04-003
- https://www.pcgamer.com/windows-10-has-a-built-in-ransomware-block-you-just-need-to-enable-it/
- https://www.cisa.gov/stopransomware
- https://csrc.nist.gov/CSRC/media/Projects/ransomware-protection-and-response/documents/NIST_Ransomware_Tips_and_Tactics_Infographic.pdf
- https://www.cisa.gov/sites/default/files/publications/CISA_MS-ISAC_Ransomware%20Guide_S508C_.pdf
- https://www.cisa.gov/sites/default/files/Ransomware_Trifold_e-version.pdf
Cybersecurity 2020: Phishing
The Federal Trade Commission explains that phishing “is a type of online scam that targets consumers by sending them an e-mail that appears to be from a well-known source.” The message attempts to get you to share valuable personal and sensitive information such as login names and passwords, bank account information or a social security number.
Tips to spot a phishing message:
- Move your cursor over all links in the message (do not click on a link) and notice the resulting text. For example, hover over this link: http://support.dasnr.okstate.edu Does the link address match the text? (In this example, notice the link does NOT point to the DASNR IT website referenced by the link text!) If not, be suspicious and consider deleting the message.
- Read the email critically. Note the sender’s reply-to address and make sure it matches the name. Watch for misspellings and unusual phrases. Be wary of deals and offers that seem too good to be true or are asking you to act with an urgency which might cloud your judgement.
- If things look legitimate but you are still uneasy, contact the sender either by telephone or with a new email message (not replying to the message).
If in doubt feel free to contact me (dwayne.hunter@okstate.edu), an OSU Extension Technology Specialist or your DASNR departmental IT Specialist. #BeCyberSmart
References:
Best Practices For Hosting a Hybrid Meeting
During this pandemic, in-person and face-to-face meetings can be especially challenging to host and it can be difficult to generate participation. Online meetings have become more accepted and hosting these meetings has become less challenging (hopefully), but still not without potential pitfalls. “Hybrid meetings,” with participants both in person and at a distance, may be a good compromise – assuming acceptable social distancing, face coverings, and appropriate equipment and room sanitizing is practiced and enforced for local, in-person participants. This overview provides a few guidelines that should be considered when hosting a hybrid meeting.
Good etiquette should be followed: make sure all participants can hear you, they can see you and all participants can see the presentation materials. Avoid distractions such as side conversations, bad lighting, bad camera angles and unmuted microphones.
As with all meetings having an online audience of several participants it is important to have recognized leadership roles with at least one co-host who can help the host monitor for questions and feedback from participants and can assist with technology-related issues.
Where possible, record your session either as a video recording or with a note taker, then plan to distribute the link to the recording or to the notes. Plan to follow up with participants either with a formal survey or with an informal message.
Be aware of the risk of isolating or alienating a participant or group of participants because of their geography. Extra focus may be needed to keep all locations fully engaged in the conversation and discussion.
Realize that meetings with an online audience might take longer to generate discussion while in-person participants may be quicker to respond. When this happens, don’t lose your online participants.
Long agendas with several topics and conversations that are expected to generate a lot of discussion may require that you split your meeting into several sessions or plan to have a follow up session. When it is not possible to split up a session, plan breaks and group similar material. Participants may choose to join the session mid-way through the meeting.
Watch for raised hands and non-verbal communication to indicate when participants cannot participate due to either technology issues or they get pre-empted by other participants.
Acknowledge your online audience participants. Purposefully include online participants into conversations and social interaction as you would with in-person participants.
All meeting materials and content should be equally viewable by all participants. If you plan to use specialized classroom equipment or demonstrate a technique to the class, plan so the online audience can watch too.
If it’s needed, use collaborative tools such as shared documents in OneDrive to generate input from participants.
Before your meeting ends, review action items and those assigned follow up with these items.
If you are interested, a separate blog post was written as a ‘best practices’ guide for online meetings: http://spotlight.okstate.edu/dasnrit/2019/03/26/online-meeting-and-webinar-best-practices/
Links for more information:
https://www.insidehighered.com/blogs/technology-and-learning/growth-hybrid-meeting
https://it.umn.edu/services-technologies/how-tos/web-meetings-hybrid-meeting-good
https://smartmeetings.com/tips-tools/63359/10-tips-and-good-practices-for-planing-a-hybrid-event
Microsoft Teams Activity and Notifications
This document provides information about activity and notifications in Teams. For more information, see https://support.office.com/en-us/article/Keeping-track-of-conversations-afe6d0e5-34f3-4469-b7bd-905aab4042a3
Getting Someone’s Attention
To get someone’s attention in a channel conversation or a chat, @mention them. Just type @ before their name and then select them from the menu that appears.
Note:
You can also mention someone simply by typing their name. Start by
capitalizing the first letter and as you continue to type the name, a
list of people will show for you to choose from.
They receive a notification, which they can click to go directly into the point in the conversation where they were mentioned.
Activity feed basics

Select Activity to view your Activity feed, a summary of everything that’s happened in the channels that are in your teams list.

Select Filter at the top right corner of the feed to show specific types of messages such as unread messages, @mentions, replies, and likes.
When a red circle appears next to Activity, you have a notification—such as an @mention or a reply—in your feed. These notifications remain in your feed for 14 days. After that they expire and no longer show in your feed.
Notes: Another way to check your notifications is to use the command box at the top of Teams.
- Type /unread to view your unread channel notifications.
- Type /mentions to view all your @mentions.
For a more specific feed, go to the Feed menu and select My activity. You’ll get a list of everything you’ve been up to lately in Teams.
Activity feed symbols
Teams attaches unique symbols to different types of notifications in your feed. That way, you can look through your feed and prioritize based on the following. This includes @mentions of you specifically, replies to your posts, posts you liked, and suggested posts.
Notifications
Six things to know about notifications:
1. Notification settings are under your profile
Access notification settings by selecting your profile picture in the top right corner of Teams, then Settings > Notifications.
2. Notification sounds can be on or off
To choose if a sound plays with each new notification, select your profile picture at the top right corner of Teams, then Settings > Notifications > toggle off/on.
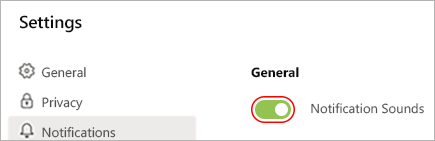
In this state, notification sounds are on.
Note: Currently, only Android mobile devices are able to choose what type of sound plays for notifications.
3. There are default settings
If
you change nothing about your Teams notifications, you’ll receive both
desktop notifications and activity feed alerts for @mentions, direct
messages (chat), and all new conversations and @mentions in the channels
and teams that show in your teams list.
4. There are four ways to get notified:
- The activity feed You’ll find this in the top left corner of Teams. This is where we’ll let you know what’s happening across your teams and channels. Check out the different kinds of activity you’ll get in Teams.
- Then there’s chat This is where your group and one-on-one conversations happen. As you receive multiple messages, we’ll keep a count of them for you.
- Desktop—aka “Banner”—notifications On Windows, these will show in the bottom right corner of your screen, then move to the Action Center. On Mac OS, these show up in the top right corner of your screen, then move to the Control Center. Note: If using Teams on the web, some browsers will only show notifications in the browser tab where you’re running Teams.
- Email If you want to use email to stay on top of Teams conversations as they happen, use the missed activity email. You choose how often you get them. If you want a summary of the day’s activity, use the digest email. You’ll get this email at the beginning of each day.
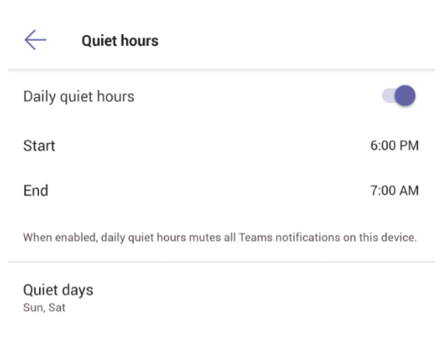
5. Things are slightly different on mobile. One of the first things you’ll want to do is choose whether to send notifications to your phone Always, or only When I’m not active on desktop. (You’re considered inactive after 3 minutes of inactivity.) The other thing you’ll want to make sure to set are your quiet hours. To do this, go to More in the top left corner of the mobile app > Notifications > Quiet hours. Then set a specific time of day when you want Teams to hold your notifications—or choose entire days.
6. You can set notifications per channel, too. When you get added to a team, we’ll automatically show the three most active channels in that team. These channels will send you notifications when someone @mentions the channel. To also get notified for all new conversations and replies, select More options … > Channel notifications, or go to notification settings, and under Shown channels select Edit.
Desktop
There
are multiple ways to access and manage notifications. To further
customize your notification settings, select your profile picture at the
top, right corner of Teams, then select Settings > Notifications. From there you can fine-tune what notifications you receive and where those notifications show up.
In Activity on the left side of Teams, select More options
on a notification. From the menu, you can mark a notification as read
or unread. You can also turn on or off notifications for a specific
channel if you want.
- Stop email notifications Click on your profile picture in the top right of the app, then select Settings > Notifications. Now you can set type of notifications you want for each type of activity on Teams. If you don’t want any emails, just make sure all activity types are set otherwise.
- Keep notifications in the app Select Only show in feed. This means all notifications will be sent to your activity feed, which you can find at the top left corner of Teams. The app will still show notifications on your desktop taskbar, but no pop-up will show.
- Get notified in app and on desktop Select Banner and feed and you’ll receive notifications as both a desktop notification and as an alert in your activity feed. On Windows, notification banners will show in the bottom right of your screen. On macOS, they show in the top right.
- Turn off notifications for specific conversations Go to the beginning of a conversation in a channel, then go to the top right corner of the message and select More options > Turn off notifications. Just like muting a chat, turning off notifications to a channel conversation will stop you from receiving updates for that specific conversation. You’ll still receive notifications if someone directly mentions you.
- Choose your channel notifications Go to a channel that shows in your teams list and select More options > Channel notifications. From there, you can choose what activity you get notifications for, and where they show up. By default, channel mentions are turned off and all new posts will only show in Activity.
Notification tips and tricks
How to get all notifications for all activity
By
default, you’ll only receive notifications for teams and channels that
you haven’t hidden from your teams list. To make sure you have all the
channels showing that you care about, follow the directions at Show or hide teams and channels.
Once
you’ve got all your channels where you want them, you’ll start
receiving notifications in Activity. If you’d also like to get these
notifications on your desktop, select Settings > Notifications > and select Edit under Shown channels and select Banner and feed.
And how to turn down the noise
Some simple ways to keep your focus on the activity that’s most important to you:
- Turn off desktop notifications for activity you don’t need to respond to right away. Select either Feed only or Off.
- Hide
a channel to turn off activity and desktop notifications. Hidden
channels will show in your list if a message is marked important or when
someone @mentions you or the channel.
- Set your presence to Do not disturb
to get some quiet time. This won’t change your notification settings,
but it will mute notifications until you change your presence back.
IOS
From your activity feed, tap Filter
to show only certain types of messages such as unread messages,
@mentions, replies, and likes. Use the feed options to select team or
individual activity. To customize your notifications, tap More > Settings > Notifications. From there tap Open settings to access your iOS settings for Teams. Then tap Notifications > Allow notifications to determine how you want to view Teams notifications.
Android
From your activity feed, tap Filter
to show only certain types of messages such as unread messages,
@mentions, replies, and likes. Use the feed options to select team or
individual activity. To customize your notifications, tap More > Settings > Notifications.
Opening EPUB files on a mobile device
Application Developers in DASNR IT are actively working with State Specialists to produce “pocket guides” – booklet forms of decision support systems – in EPUB formats. These formats can be opened and viewed on mobile devices similar to a book. This blog post provides information on how to open the EPUB file on both the iOS and Android device.
Open EPUB files in iPhone/iPad:
1. Download Apple Books from AppStore
2. Open the link (Ex: http://www.dasnr.okstate.edu/apps) to reach the ePub document.
3. Click on ePub file
4. When asked: “Do you want to download ‘filename. Pub’?”, click the “Download” button
5. In the upper right, download appears as:

Click on it and it will open the book in the Apple Books app and be added to your books collection. When you next open the ePub document from the iBooks app on your iPad, this app will be used.
Open EPUB files on Android using Google Play Books
Download the Google Play Books app on your Android device, if already not already installed. The Play Books app allows you to open EPUB files and read all your favorite books with ease. Google Play Store has an easy to browse books section that lets you download all the e-books that you want. You can also upload you own eBooks from anywhere using the
Google Play Books website. It is easy and allows you to read all your
eBooks on your phone using the app. If you haven’t already downloaded
the app, then we recommend that you head over to the Play Store and
download the Google Play Books app on your phone.
1. Install Google Play Books app (if not installed by default)
2. Open the link in browser to reach the ePub document.
3. Click on ePub Document and it will download the document.
4.
After Download a Dialog appears “By uploading your file to Play Books,
you can read it anytime, anywhere. Uploading may take a few minutes”,
just click “GOT IT”
5. It will ask the permission “Allow Google
Play Books to access photos, media and files on your device?”, Press
“ALLOW” button.
6. The downloaded ePub document will appear in “Your books” category in Library of Play Books.
Cyber Security Awareness in 2019: Acronyms and Their Uses
Often, IT professionals get (unfairly!) accused of excessive use of acronyms. FYI: DYK that in DASNR @ OSU we love aconyms too, IMHO. LOL! But cyber security is something we all should take seriously. In this article, we define several phrases or terms you may have seen – maybe some are new to you – and provide a short explanation of their intended harm. In our summary we provide advice on how to guard against the problems.
Botnets – a vicious network of infected computers that act under the control of the hacker to spread spam email messages, malware, and distributed denial of service (DDoS) attacks.
Cryptomining – a legitimate looking app is installed to the computer then allows a hacker to remotely harness the computer’s processing power to mine cryptocurrencies.
DDoS – a botnet army causes a web server to fail due to an overload of requests thereby effectively shutting down the web service.
Hacking – the act of someone or something gaining unauthorized access to your computer or device through exploits on the computer or device.
Malvertising – advertising infected with malware
Malware – hackers gain control over your computer or device through infected software downloaded and installed on the device.
Pharming – visiting a malicious and illegitimate website posing as a legitimate one. When the site visitor clicks on the page, they are redirected to a scam.
Phishing – similar to pharming, phishing is a method to lure unsuspecting visitors to divulge confidential information such as passwords and banking details, often being presented in a manner that looks official or intimidating to elicit an immediate action.
Ransomware – a type of malware that infects the computer or device and restricts access to files, demanding payment to regain access.
Spam – mass distribution of unsolicited messages and advertisements.
Spyware – software installed on a device that allows personal information to be collected and sent to a remote site; normally uncontrollable pop-up messages are indicative of spyware or malware.
Viruses – similar to malware, infected email attachments and software downloaded then installed from the internet can infect the device. Once infected, the device can display unwanted ads, scan for personal information, hijack your web browser, and cause other problems.
Whaling – a specific type of phishing attack that targets high-profile employees in order to steal sensitive information from a company or organization.
Wifi Eavesdropping – a hacker can ‘listen’ on insecure WiFi networks, thereby accessing personal information sent over the network and possibly accessing your device.
Worms – worms can be spread through the network and attack vulnerable computers and devices that are not updated, effectively shutting down parts of the network.
How can you protect your computer and device? In nearly every situation described above, the solution is straightforward:
- Keep your computer and device updated. When Microsoft, Apple, or Google release updates, make sure your computer or device is being updated.
- Install, activate, and keep updated an anti-malware software application.
- Use adblock extensions with your browser.
- Use a spam filter with your email application.
- Before clicking on links in email messages, notice their address and confirm the link is consistent with the sender; look for inconsistencies in the message that would be characteristic of a scammer’s message.
- Use good passwords.
For more information or if you have questions about information presented in this article, feel free to contact Dwayne Hunter or others in DASNR Information Technology.
Additional material and links:
Online Meeting and Webinar Best Practices
Using web-based technology to hold meetings, distribute information, and deliver presentations can free up time and energy otherwise spent on traveling. However, online events require planning to minimize the possibility of problems and to meet the expectations of both the presenter and the attendee. This article will provide guidance for using Zoom as a DASNR presenter to both internal and external audiences.
About DASNR’s Zoom License
Basic Zoom licenses are free and allow you to host an online meeting for up to 40 minutes with 100 people. DASNR’s Pro Zoom licenses allow licensed individuals to host meetings up to 24 hours in length and up to 300 people. DASNR IT manages a limited number of Zoom Pro licenses. We maintain one license for Zoom Webinar that extends the Pro license to up to 500 people. For both Meetings and Webinars, the host can stream their session to YouTube Live or Facebook Live. If you are interested in obtaining a license, please contact Dwayne Hunter at dwayne.hunter@okstate.edu. If you are interested in Zoom’s comparison between Meetings vs Webinars, see this link.
When the host chooses to record their session, Zoom will ask if the recording is being stored locally or to the cloud. DASNR has a small amount of cloud-based storage use to hold recordings. Because of the limited storage, you will have two weeks to move your recordings off the Zoom cloud storage then the recordings will be removed. You can make your recordings available to others using your OneDrive (as as shared file), through YouTube or with Microsoft Stream. If you are interested in using YouTube, please contact Craig Woods in Ag Communications Services who can make your recording available either as unlisted (private) or public. With OSU’s license to Microsoft’s Office 365 Stream, uploaded recordings can be restricted to OSU employees.
Best Practices and Guidelines
Rehearse your session with at least one other person and with the equipment and presentation material you plan to use during your actual online meeting. Talk through your main objectives with the individual or focus group. Ask for feedback and attempt to address issues during your rehearsal.
Plan to use at least two display monitors. This allows you to host the presentation on one monitor while the second monitor can show the chat, Q&A and participants list. A laptop computer may be useful if two monitors are not available.
Consider the length of your session. Be aware that an attention span can wane with longer meetings. Typical online events will be no more than one hour.
Plan to have at least one other person who can be your behind-the-scenes co-host. They can manage your session recording, assist participants, watch for questions and provide answers (when applicable), or alert you about questions that require an answer. You may want to use an Extension Technology Specialist to help with technical support issues.
During your webinar ask questions that require feedback. With larger audiences, you may want to avoid enabling participants’ microphones for feedback and input but, rather, use the chat and Q&A windows. Realize your audience may have distractions while on their computer so use a discussion-based presentation that encourages active and frequent participation.
Explore the annotation and screen sharing tools offered in Zoom. The annotations tools can highlight areas of your presentation and personalize the content to your audience. Zoom’s screen sharing option gives you the ability to make live demonstrations of software, web tools, etc.
Take advantage of Zoom’s video capabilities by activating your camera. But, be aware of your camera’s placement: notice your background and eliminate possible distractions, evaluate your lighting and make adjustments if necessary, keep the camera level with your eyes so you can maintain eye contact as much as possible, and use your primary display monitor so you are facing the camera during the presentation.
After the meeting, use Zoom’s presenter’s tools to download your recorded video and audio, view the chat, and generate a participant listing.
Live Meetings
While this article was primarily focused on web-based meetings and webinars, you may be interested in helpful resources for conducting in-person meetings:
Helpful Links