Zoom AI Companion

Zoom recently introduced AI features that could enhance your Zoom Meetings and provide users with more personalized experiences. OSU Enterprise IT has announced that some of these features will be available to all those who login to Zoom with their OSU accounts and are available now.
AI-Powered Meeting Assistance
Zoom’s AI assistant can summarize meetings, capture key action items, and generate follow-up tasks automatically. This allows participants to stay focused on discussions without worrying about missing important details. Participants will also be able to chat with Zoom AI Companion about what they missed if they join late and get real-time responses during your meeting. Read some of the tips and tricks for Zoom AI Companion from Zoom employees here.
Real-Time Transcription and Translation
The platform has integrated real-time transcription and translation services powered by AI, enabling participants from different linguistic backgrounds to communicate more effectively. This feature helps to foster inclusivity and ensures that language barriers don’t hinder collaboration.
AI Companion in Whiteboard
AI Companion can help jumpstart brainstorming by generating topics for discussion based on your prompt. After a prompt or using content already available, AI Companion can generate content for your whiteboard, and then help you organize with mind maps and flowcharts.
Enhanced Data Privacy
With AI handling more of the workload, Zoom has placed a strong emphasis on data security and privacy. The AI features are designed with encryption and compliance standards in mind, ensuring that your data remains secure. Zoom does not use any customer audio, video, chat, screen sharing, attachments, or other communications-like customer content (such as poll results, whiteboard, and reactions) to train Zoom’s or its third-party artificial intelligence models. Read more about Zoom AI Security and Privacy here.
Conclusion
Zoom’s latest AI features offer a significant upgrade to the virtual meeting experience. Whether through smarter meeting summaries, seamless translation, or automated scheduling, these tools are designed to make virtual collaboration more efficient and user-friendly. Stay ahead of the curve by leveraging these new capabilities in your daily workflow. Check out the Zoom AI Companion website for more information.
Strengthening Security: The Importance of Password and Physical Security in the Digital Age
In the modern information age, safeguarding sensitive information has become more critical than ever. Whether it’s personal data, university data, or even your social media accounts, both password security and physical security are crucial in protecting our valuable resources. Here’s why these two components are essential and how you can enhance them.
Password Security: The Digital Frontline
Passwords act as the first line of defense against unauthorized access to accounts and information. Unfortunately, weak passwords are often the easiest entry point for cybercriminals. With hacking techniques becoming more sophisticated, creating a strong password is not just a recommendation, it’s a necessity. Passwords are like the keys to your digital life. To keep your data and personal information protected you should use secure passwords and/or secure them in a password manager.
Common Weaknesses in Passwords
- Simple passwords: Many people still use easy-to-guess combinations like “password123” or “abc123.” Also, the shorter the password, the easier it is for cybercriminals to guess or break.
- Reusing passwords: Using the same password across multiple accounts puts all your accounts at risk if one is compromised. The same holds true for similar passwords.
- Predictable patterns: Using personal information like birthdays, names, or common words makes it easier for attackers to guess passwords.
- Lack of multi-factor authentication (MFA): Not taking advantage of MFA adds another layer of vulnerability.
Best Practices for Strong Passwords
- Use a mix of characters: Combine upper and lower-case letters, numbers, and special characters.
- Length matters: A strong password should be at least 12-16 characters long. The longer, the better.
- Avoid common words or phrases: Stay away from easily guessable phrases and information. If your password is a common phrase from your favorite movie, it would be easier to guess than if it were random.
- Use a password manager: Tools like Bitwarden or Lastpass can generate strong, random passwords and store them securely. This makes it easy to manage your passwords, as you only need the password for the manager to access all other passwords.
- Enable multi-factor authentication (MFA): Always enable MFA when available. It adds a crucial extra layer of security by requiring a second form of identification beyond just the password. Many forms of MFA will send you text messages or emails to prove your identity, something that a cybercriminal wouldn’t have access to.
- Regularly update passwords: Periodically changing your passwords reduces the risk of long-term attacks. And especially changing the password to your password manager occasionally would help to mitigate risk of data theft.
To find more tips and tricks for passwords, please visit https://www.cisa.gov/secure-our-world/use-strong-passwords from the Cybersecurity & Infrastructure Security Agency.
Physical Security: Protecting the Hardware
While password security protects the virtual realm, physical security is equally vital. Physical security involves measures that prevent unauthorized access to computers, digital devices, and sensitive documents in your environment. Cybercriminals don’t always operate in the digital world. Sometimes, they gain access to data through physical means.
Common Physical Security Risks
- Unattended devices: Leaving laptops or phones unlocked in public places can lead to data theft. If you have a computer that is used by the public, making sure that there is a guest user on the machine that limits access to network resources is a must.
- Weak building access controls: Lack of secure doors, locks, and surveillance can allow unauthorized individuals to enter restricted areas.
- Stolen or misplaced storage devices: USB drives and external hard drives can be easily lost or stolen, potentially exposing sensitive data. Make sure to keep anything that contains sensitive data under lock and key.
- Dumpster diving: Discarded paperwork or old equipment can contain valuable information if not disposed of properly.
Best Practices for Physical Security
- Secure workstations and devices: Always lock devices when they’re not in use and store them in secure locations. A quick way to lock your computer or laptop is to tap the Windows Key + L on your keyboard before leaving your area.
- Implement access controls: Use keycards or digital locks, or even just traditional door locks to control access to your office areas where computers or sensitive information is kept.
- Shred sensitive documents: Before disposing of any paperwork that contains personal or sensitive information, shred it to prevent theft.
- Surveillance systems: Install cameras and alarms in critical areas to deter unauthorized access and monitor activity.
- Regular audits: Perform periodic checks of your security infrastructure to identify weaknesses and ensure compliance with physical security protocols. Role play as a customer that has access to your office space and identify which areas are prone to security risks.
Combining Both: A Holistic Approach to Security
A layered approach that combines password security and physical security is essential. Even the strongest digital security can be undermined if someone gains physical access to your devices, and the best physical security measures won’t help if your passwords are weak. Here are a few key considerations for a comprehensive security strategy:
- Training and awareness: Educate employees and family members about the importance of both password and physical security. Awareness of phishing attempts, shoulder surfing, and tailgating can significantly reduce risk.
- Incident response plan: Have a clear procedure in place in case of a security breach, whether digital or physical. Time is critical when responding to security incidents.
Conclusion
Both password security and physical security are pillars of a strong security framework. While many people focus heavily on digital security, it’s important not to overlook the physical aspects that could make your data vulnerable. By taking a comprehensive approach and implementing best practices in both areas, you can significantly reduce the risk of security breaches, protecting your assets in both the virtual and physical world. Feel free to contact your Computer Support Specialist to address any concerns you may have on securing your environment.
Also be sure to check out CISA.gov and staysafeonline.org for more information on cybersecurity.
Farewell, Calibri: Introducing Aptos
Three years ago, Microsoft announced its intention to move away from using Calibri as the default font for Word, Excel, PowerPoint, Outlook, and other apps in the suite formerly known as Microsoft Office, now known as Microsoft Office 365. After evaluating five candidate fonts, Aptos, formerly known as Bierstadt, has emerged as the winner.
What Is Aptos?
- Aptos is a sans-serif font family designed by Steve Matteson, who also created Times New Roman, Arial, and Courier New. Matteson also created the widely used Segoe font (Windows’ default system font since Vista and also part of Microsoft’s current logo).
- The main flavor of Aptos is described as “Helvetica” with “a bit of a human touch,” making it “more approachable and less institutional.”
- Aptos comes in various styles, including condensed, monospaced, and serifed versions.
Why the Change?
Microsoft hasn’t explicitly stated why it’s moving away from Calibri, but the change suggests that Aptos was crafted with more modern high-resolution, high-density displays in mind. When Calibri replaced Times New Roman as the default font in Microsoft Office 2007, “Retina” displays were not yet widespread, and 1024×768 and 1280×800 screens were the norm.
Implementation and Availability
The switch to Aptos has already begun for Microsoft 365 subscribers, including those at the university with the latest version of the Office 365 applications.
Conclusion
In summary, Aptos brings a fresh look to Microsoft Office, combining professionalism with a touch of humanity. As we bid farewell to Calibri, let’s welcome this new font family into our digital workspace.
If you have any questions or concerns, please contact your Computer Support Specialist.
Service Accounts and Their Uses
What is a Service Account?
At Oklahoma State University, employees can request the creation of an additional email address that is separate from their personal OSU email. This email address can be used for communication, social media, or to create accounts for online services like Google, Apple, and others. Service Accounts also have access to storage in OneDrive, making it a great tool to use for file sharing and storage in your office.
This is beneficial for many reasons, but one main benefit is that the email address can be used by continuing employees, even after the original requestor separates or retires from the university.
How does it work?
To request a Service Account, please contact your Computer Support Specialist and let them know how you would like the Service Account formatted, examples include washita4H@okstate.edu or agricultureIT@okstate.edu.
Also, your Computer Support Specialist will also need to know who will be managing the Service Account, or essentially who will “own” the account and email address. There is a minimum of two owners for each Service Account.
The owners of the Service Account also manage the account’s password in OKEY; keep in mind that because this is an additional account and email address, its password will be separate from your personal account. You can then access emails and OneDrive for the Service Account either by signing into cowboymail.okstate.edu, or adding the new account to your existing desktop apps like Outlook or OneDrive.
One other thing to keep in mind is that Service Accounts only last a year. However, they can be extended as many times as necessary year after year. Note the Extend option in the image below.
Changing the Service Account Password
Once the Service Account has been created, any of the owners can change the password. The password requirements for Service Accounts are the same as for your personal accounts.
- Open your favorite web browser and navigate to okey.okstate.edu
- Sign in with your personal OSU email address and password, Don’t try to sign into the Service Account at OKEY
- In the left-side navigation menu, find and click on Service Accounts
 Service Account options in OKEY
- Click the Modify option listed in the Service Account info box.
- In the new left-side nav menu, find and click on Change Service Account Password near the top.
Here, you can change the password for the service account. The Service Account password is for accessing the email and other Microsoft 365 services for this account, like OneDrive. Notice that this does not change the password for any online accounts created with this email address, such as Google, Apple, or others.
Need Help?
Service Accounts are a great way to create a custom email address you can use for communication, OneDrive storage and sharing, social media, etc. If you have any questions, please contact your Computer Support Specialist.
Why is Cybersecurity Awareness Important?

In today’s information age, where technology plays an integral role in our daily lives, the importance of cybersecurity awareness is often overlooked but cannot be overstated. From personal data leaks to large-scale cyberattacks on corporations and governments, the digital world is saturated with threats that can have far-reaching consequences.
This article delves into the reasons why cybersecurity awareness is not just an option, but is very important for individuals, organizations, and society.
Protection of Personal Data
According to the U.S. Federal Trade Commission (FTC), identity theft remains one of the top consumer complaints. In 2020, the FTC received 1.4 million fraud reports, with identity theft accounting for 20% of those reports. Cybersecurity awareness empowers us to recognize the signs of phishing emails, fraudulent websites, and malicious software, helping us safeguard our personal information from falling into the wrong hands.
Financial Security
The financial impact of cyberattacks is significant. According to the Federal Bureau of Investigation’s Internet Crime Complaint Center (IC3), in 2020, the total cost of cybercrime reported to IC3 exceeded $4.2 billion. Understanding cybersecurity basics can help us recognize potential scams and keep us from falling victim to scams and phishing attempts that can lead to financial and data loss for OSU.
Preservation of Reputation
Cybersecurity breaches can tarnish an organization’s image. The U.S. Department of Health and Human Services reports that in 2020, there were 642 healthcare data breaches affecting over 30 million individuals. We provide training and information every October. Cybersecurity awareness helps educate staff and ourselves on potential risks, reducing the likelihood of data breaches and preserving our hard-earned reputation at Oklahoma State University and OSU Agriculture.
Safeguarding Intellectual Property
Intellectual property theft can be a concern for the university. The FBI’s Economic Espionage Unit reports that cyberattacks aimed at stealing intellectual property are on the rise. Cybersecurity awareness helps OSU and the Extension county offices protect their valuable intellectual assets from theft.
Cyber Hygiene for Everyone
Just as personal hygiene practices prevent disease spread, cyber hygiene practices help prevent digital threats. The Cybersecurity and Infrastructure Security Agency (CISA) recommends good online habits like regularly updating software and using strong passwords. These habits reduce vulnerabilities and contribute to a safer digital environment for everyone.
The Pervasiveness of Cyber Threats
According to the U.S. Department of Homeland Security (DHS), cyber threats are constantly evolving. Awareness of these threats is crucial to staying ahead of cybercriminals. Your Computer Support Specialists work tirelessly to identify and mitigate emerging threats, but an informed staff and employee is the first line of defense.
Conclusion
Cybersecurity awareness is not a luxury but a necessity in today’s interconnected world, as supported by government statistics. Ignorance or complacency in this regard can have dire consequences. By understanding the importance of cybersecurity awareness and actively implementing best practices, we and the university can better protect and contribute to a safer digital environment for all. In the age of information, knowledge is power, and cybersecurity awareness, backed by government data, is the key to securing our digital future.
Sources for Statistics
- Federal Trade Commission (FTC) – The FTC provides reports and statistics on identity theft and consumer complaints related to cybersecurity.
- Federal Bureau of Investigation (FBI) – The FBI’s Internet Crime Complaint Center (IC3) offers information on cybercrime, including statistics and reports.
- U.S. Department of Health and Human Services (HHS) – HHS provides data on healthcare data breaches and security in the healthcare sector.
- Cybersecurity and Infrastructure Security Agency (CISA) – CISA is a U.S. government agency that offers resources, alerts, and reports on cybersecurity threats and incidents.
- U.S. Department of Justice – The Department of Justice may provide information on legal and regulatory compliance related to cybersecurity.
- U.S. Department of Homeland Security (DHS) – DHS often publishes reports and resources on cybersecurity threats and trends.
National Cybersecurity Awareness Month 2022: Physical Security
National Cybersecurity Awareness Month 2022 provides an opportunity to review a basic yet very important security measure: physical security of our technology and computers. Limiting and preventing physical access to the technology is key to preventing unauthorized access to our computers and data, whether it is personal or university owned. Some offices have barriers, such as doors or counters, that block unwanted access and stop people from wandering into sensitive areas; other offices have more open floor plans allowing people more opportunities to commit acts of cybercrime. The following list outlines a few things you can do to limit physical access to computers and sensitive data.
- One of the easiest ways to limit access is to password protect your computers, devices, and networks. By password protecting your devices, you can stop potential criminals from easily accessing your data while you are away.
- Protect your portable equipment as well by securing them with passcodes or passwords. Also if possible, think about securing them with physical locks. This is especially handy for conference rooms or classrooms where devices can be taken without notice.
- When stepping away from your desk or leaving for the evening be sure to log out or “lock” the computer. If using a Windows PC, press the Windows Key + L to instantly lock the computer, requiring a password when returning to log back in. This has the potential to stop anyone from accessing your data if you need to step away from your desk for a few minutes.
- When the front desk receptionist or greeter is out or they step away from their desk, consider using signage and/or a bell to ring for assistance. If you aren’t one of the lucky offices to have proper barriers for entry, this allows the public the option of signaling for assistance instead of having to walk through the offices to find assistance.

- When your meeting space is being used, consider having a member of the office present during the meeting or close by the meeting room so they know when the meeting has finished. The physical presence minimizes the risk of someone removing equipment from the room.
- Many offices offer computers for public use such as, for example, 4-H members, county fairs, etc. If your office has a computer designated for public use, do not allow sensitive data to be stored on the computer, do not store passwords to websites and confirm the user’s account has limited or guest account, not an administrator account.
- If you wish to have a wireless network for use by the public, enable a separate guest network with limited access and bandwidth. Modern network equipment has this capability built in but needs to be enabled and properly configured.
- Employee Awareness Training can be a huge help for your staff. Think about having discussions regularly regarding the safety of your technology and data. Feel free to loop your Computer Support Specialist in on these discussions for additional ideas or strategies for the office.

By being proactive for physical protection of our technology and devices, we can ensure our devices and data are safe and secure from prying eyes. Contact your Computer Support Specialist if you have questions.
Here are some links for further reading.
Tips for Creating a Strong Password
5 Ways to Be Cyber Secure at Work
Stay Safe Online – National Cybersecuirty Alliance
Cybersecurity & Infrastructure Security Agency
Using the Accessibility Checker in Microsoft Office 365 Apps
Whether you are creating content for the public or making an internal document for review, making that content accessible is one of the best things you can do for its readability. Accessible documents are generally easier to read, plus you have the added advantage of creating content that most people, including those with disabilities, will be able to consume.
What are the guidelines for content accessibility?
There are a few different resources out there for guidelines and policies for accessibility.
Policies and Regulations
- OSU Policy – It is the policy of Oklahoma State University to ensure that university web pages are usable by people with disabilities.
- Federal Regulations – The Americans with Disabilities Act and Section 508 of the Rehabilitation Act requires public institutions, such as universities to have accessible web sites. It is interpreted to apply to the Internet as well as physical spaces.
Guidelines for Accessibility
Using the Accessibility Checker in Microsoft Office 365 Applications
Microsoft Office applications such as Word, Excel, and PowerPoint have built in tools to help you check the accessibility of your content. These tools are constantly running in the background and will tell you if something needs to be addressed.
Where are the tools?
There are three places you can look for the accessibility tools in your apps.
- In the bottom left corner of your application, you might notice an info pane that has the accessibility checker status information. If you are using Office 365 Online, this might not show.

- In the tool ribbon located under the Review tab, there is a button that will allow you to check accessibility.
- If you click on File, then click on Info, there is an option to Check for Issues. You can check for accessibility there as well.

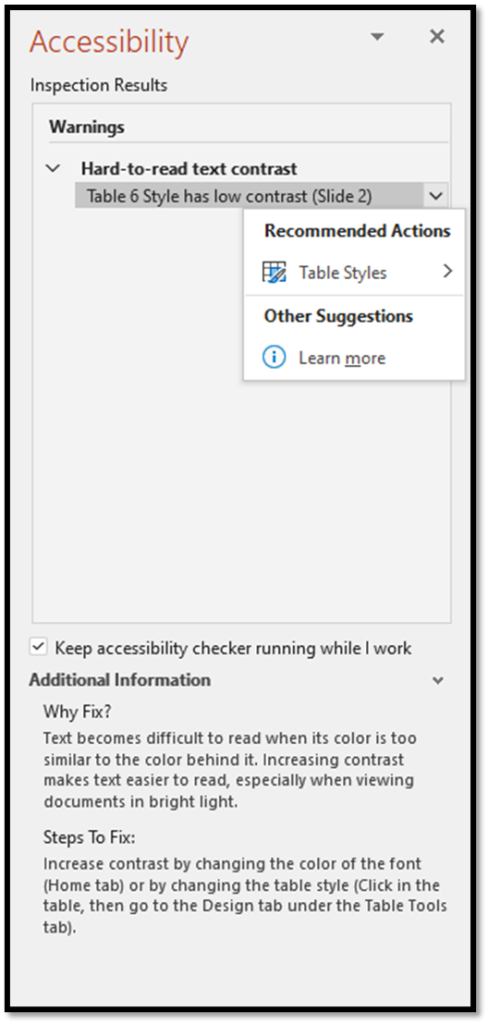
How do I fix any issues that the Accessibility Checker finds?
Once you open the Accessibility pane by selecting one of the options listed above, the checker will show you any issues it finds. From there, you can highlight or click the dropdown next to the issue and it will recommend available fixes for that specific issue. Notice that the Accessibility Checker will also tell you why an item might be an issue for someone that has a disability.
In Conclusion
When you export your documents to a PDF format, you will need to check and fix accessibility for those PDFs individually, as there may be some items that need attention, but using Microsoft’s built-in checker will minimize most of those issues in your PDFs.
Making your content and documents accessible extends your potential audience to the underserved in your communities. If you would like to know more about using Microsoft’s built-in Accessibility Checker, please refer to Microsoft’s Support pages. Feel free to contact your Computer Support Specialist as well.
Phight the Phish!
Cybersecurity Awareness Week 2: Phight the Phish!
As we head into the second week of Cybersecurity Awareness Month 2021, we should take some time to be aware on how to Phight the Phish! Cyber criminals are coming up with new ways to “phish” for your information using browser redirect hijacks and Windows notifications. “Phishing,” in the tech world, is the fraudulent practice of purporting to be from reputable companies and attempting to induce individuals to reveal personal information, such as passwords and credit card numbers. I’ll show you how to recognize and prevent such things from happening on your end.
What is Browser Hijacking?
We use an internet browser to find and search for content. Common browsers are Chrome, Firefox, Safari and Edge. Browser hijacking occurs when unwanted software is installed on a browser and alters the ability to search for information. This can cause website redirects that open malicious websites where cyber criminals:
- Steal data such as identity, banking and passwords
- Use the video camera and microphone to spy
- Collect keyboard entries
- Display persistent (pop-up) advertising
- Run a try-before-you-buy hard sell advertisement
For example, criminals entice you to visit a website containing scripts that work with your browser to install the malware or you click on a link from this website and malware is installed. Once this happens, your browser has been hijacked!
Should this happen to you, do not call the listed telephone number and do not provide any personal information. Most of these browser hijacking types of attacks are relatively harmless: normally you can reboot your computer or force the browser to close and the issue will go away. We suggest you scan your computer with an anti-malware tool such as Windows Defender to ensure your computer is not infected. If you are unsure of what to do or if you are unsure if something is legit or safe, please contact your Computer Support Specialist.
Another phishing method is to click a link that takes your browser to a website hackers have crafted to mimic a well-known site you often visit. Here, they attempt to capture critical information such as your user ID and account, password, full name, address, social security number, and even answers to security questions — mother’s maiden name, etc. With this information cyber criminals use the information to access your online accounts. This could lead to identity theft and the loss of money.
Why am I getting these ads in my notifications area?
Another popular tool cyber criminals use to phish for your information is a browser notifications plugin. You might be browsing the Internet or working on an Excel spreadsheet and notice a popup in the bottom right part of your screen saying you have viruses or malware. The images below show the difference between an ad and a valid Windows Defender notification.
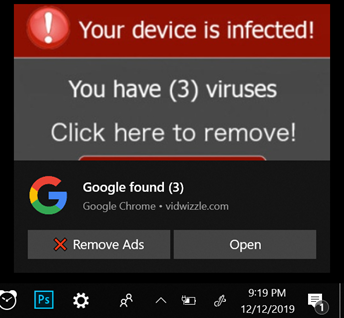 Notification Ad
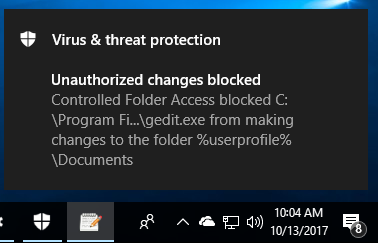 Valid Windows Defender message
Similar to browser redirects, these pop-up notifications are harmless; most of the time they are ads or websites trying to phish for your personal information. You can either ignore these completely or close them out but the easiest thing to do is turn off notifications altogether from whichever browser you use: On a PC, open your Settings window by clicking your start button in the lower left part of your desktop and clicking on the gear icon.
Then click the System option.
Then you will click the Notifications & Actions option in the left menu and you will want to turn OFF the notifications for Chrome or whichever browser you are using. This should disable those ads from reappearing.
While these notification ads are targeted for Windows 10 computers, Mac users might also experience unwanted pop-ups. However, notifications on a Mac are site specific. To prevent sites from showing you intrusive or misleading ads by changing your settings.
- Open Chrome
 .
. - At the top right, click More

 Settings.
 - Under “Privacy and security,” click Site Settings Ads.
- Choose the option you want as your default setting.
#PhightThePhish
We must all do our part in recognizing and adapting to changes in ways online criminals can phish for our personal information. Below are a few links with more tips on how to recognize and be aware on how to PHIGHT THE PHISH!
Be sure to contact your DASNR IT Computer Support Specialist for additional info on phishing attacks!
- https://www.cisa.gov/
- https://www.cisa.gov/cybersecurity-awareness-month
- https://www.cisa.gov/sites/default/files/publications/Cybersecurity%20Awareness%20Month%202021%20-%20Identity%20Theft%20and%20Internet%20Scams%20Tip%20Sheet_0.pdf
- https://www.cisa.gov/sites/default/files/publications/Cybersecurity%20Awareness%20Month%202021%20-%20Phishing%20Tip%20Sheet.pdf
Sync Files with OneDrive in Windows
With OneDrive, you can sync files between your computer and the cloud, so you can get to your files from anywhere – your computer, your mobile device, and even through a web browser by accessing CowboyMail. If you add, change, or delete a file or folder in your OneDrive folder, the file or folder is added, changed, or deleted on the OneDrive website and vice versa. You can work with your synced files directly in File Explorer and access your files even when you’re offline. Whenever you’re back online, any changes that you or others make will sync automatically.
Connecting Your Computer to OneDrive
If you’re using Windows 10, your computer already has the OneDrive app installed.
- Select the Start button, search for “OneDrive”, and then open it.
- When OneDrive Setup starts, enter your OKState email address, and select Sign in.
- If it asks, be sure to select the option for Work or School Account.
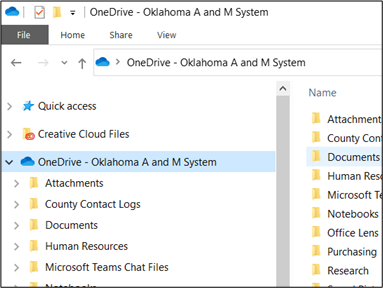
- Finish the setup wizard and you will be able to access your OneDrive files using the File Explorer on your taskbar.

- Your OneDrive folder will be located on the navigation menu to the left.
Syncing Shared Folders to Your Computer
When someone shares a folder with you, it appears in the Shared section of your OneDrive online via CowboyMail. If you have Edit permissions to those shared folders, you can add them to the My files section of your OneDrive to make them easier to access and work with.
Notes:
- You can only add shared folders to your OneDrive, not individual shared files.
- Shared folders added to your OneDrive do not use any of your OneDrive storage space. They only count against the folder owner’s storage space.
- You can also access shared folders from your Shared list on OneDrive.com or in the OneDrive mobile apps. You can still copy, move, edit, rename, share, and delete anything in the folder.
Syncing Shared Folders
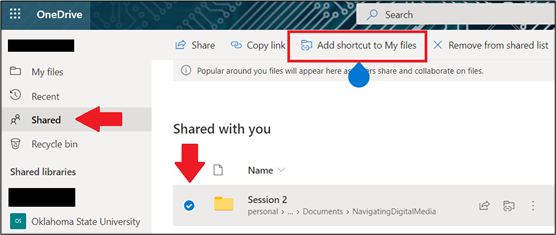
- Sign in to CowboyMail on your browser with your OKEY credentials and click the Waffle Icon and choose OneDrive.
- On the left navigation pane, under OneDrive, select Shared.
- Locate the folder you want to add, select the circle to the left of the folder’s title, and then select Add shortcut to OneDrive on the top menu. Or right-click a folder and select Add shortcut to OneDrive.
- Open your File Explorer again and you’ll notice the shared folder will now be available under your main OneDrive folder. From there you can add or view files within that folder.

In Conclusion
Microsoft has made it very easy to sync shared folders to your computer. If you get stuck or would like any further information about shared folders in OneDrive, please contact your respective Computer Support Specialist.
How to Use Breakout Rooms in Zoom
Breakout rooms allow you to split your Zoom meeting in up to 50 separate sessions. The meeting host can choose to split the participants of the meeting into these separate sessions automatically or manually, or they can allow participants to select and enter breakout sessions as they please. The host can switch between sessions at any time.
Limitations
By default, only the host or co-host can assign participants to breakout rooms. They can choose to allow participants to choose their own room, but this must be done in the meeting when launching the breakout rooms.
Users who join a Zoom meeting from the Zoom Mobile App, their phone using the call-in numbers, or from a web browser can participate in breakout rooms but cannot manage them, so your designated host or co-hosts need to join using the Zoom client on a desktop or laptop.
Those participants who called-in and those joining via a web browser also will not be able to select their own breakout session and will have to be placed into a room by a host or co-host. Also, users will have to update their client to at least version 5.3.0 or later before being able to select their own room as well.
If the meeting is being recorded to the Zoom Cloud, only the main room will be recorded, not the individual breakout rooms. Alternatively, when a participant chooses to record their session using the “Local Recording” option, the recording will record the room in which that participant resides.
Multiple participants can record locally to their devices but hosts will have to manually select which participants are allowed during the meeting by hovering over their name, clicking the More option, and choosing the option Allow Record.
Verifying Breakout Rooms Are Enabled for Your Meetings
Sign into the Zoom web portal at dasnr.zoom.us with your OSU email address and password.
In the navigation menu, click Settings.
Navigate to the Breakout Room option under the In Meeting (Advanced) section and verify that the setting is enabled.

If the setting is disabled, click the toggle to enable it. If a verification dialog displays, choose Turn On to verify the change.
Creating Your Breakout Rooms
After the meeting has started, you can click the Breakout Rooms button on the main bar at any time during the meeting.

Select the number of rooms you would like to create, and how you would like to assign your participants to those rooms:
- Automatically: Let Zoom split your participants up evenly into each of the rooms.
- Manually: Choose which participants you would like in each room.
- Let participants choose room: Participants can select and enter rooms on their own.

Options for Breakout Rooms
After creating the breakout rooms, click Options (on Windows) or the gear icon (on macOS) to view additional breakout rooms options.
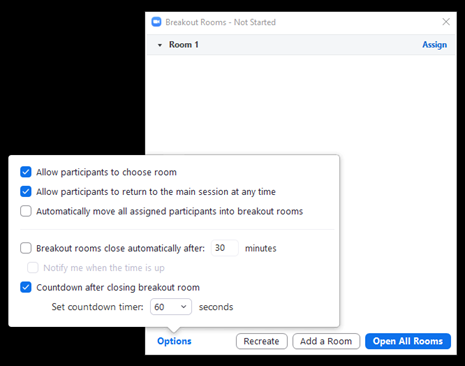
Check any options that you would like to use for your breakout rooms.
- Allow participants to choose room: Participants can select and enter rooms on their own once rooms are launched.
- Allow participants to return to the main session at any time: If this option is checked, the participants can move back to the main session from their meeting controls. If this is disabled, they need to wait for the host or co-host to end the breakout rooms.
- Automatically move all assigned participants into breakout rooms: Checking this option will move all participants into the breakout rooms automatically. If this option is unchecked, the participants will need to click Join to be added to the breakout room.
- Auto close breakout rooms after () minutes: If this option is checked, the breakout rooms will automatically end after the configured time.
- Notify me when the time is up: If this option is checked, the host and co-hosts will be notified when the breakout room time is up.
- Set Countdown timer: If this option is checked, the participants will be given a countdown of how much time they have left before being returned to the main room.
Follow the steps below to assign participants to rooms or click Open All Rooms to start the breakout rooms.
Assigning Participants to Rooms
To assign participants to your rooms, select Assign next to the room you wish to assign participants to and select the participants you want to assign to that room. Repeat this for each room.

Once a participant has been assigned (manually or automatically), the number of participants will show in place of the Assign button.
After manually or automatically assigning participants to rooms, you can rearrange the participants. Participants who are not assigned to breakout sessions will remain in the main meeting when the rooms are started.
- Move to (participant): Select a room to move the participant to.
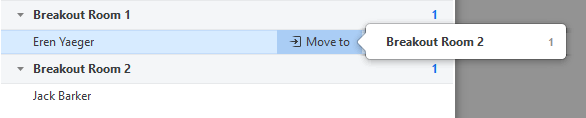
- Exchange (participant): Select a participant in another room to swap the selected participant with.

- Delete Room: Delete the selected room.
- Recreate:
- Recreate all Rooms: Deletes existing breakout rooms and allows the host/co-host to create new ones.
- Recover to pre-assigned rooms: Recreate the breakout rooms with the pre-assigned arrangement. This is only available if using the pre-assign breakout rooms feature.
- Add a Room: Add another breakout room.
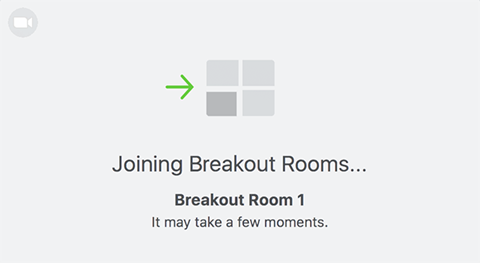
- Open All Rooms: Breakout rooms are opened and all assigned participants will be moved to their respective rooms after confirming the prompt to join the breakout room. If allowing participants to choose their own room, they can open the list of rooms and choose which to join. The host, or co-host who launched the breakout rooms and the original host, will be left in the main meeting until they manually join a room. The participants (and the host/co-host when manually joining a room) will see the following message shown when joining the breakout room.
Managing Breakout Rooms in Progress
Once the breakout rooms have been started, the assigned participants will be asked to join the Breakout Session. The host, or co-host that launched the breakouts and the original host, will stay in the main meeting until joining a session manually. If a participant has not joined the session yet, it will be noted by (not joined) next to their name.
- Join: Join the breakout room.
- Leave: Leave the room and return to the main meeting (only shows when in a breakout room).
- Close All Rooms: Stops all rooms after a 60 second countdown, which is shown to the host, co-hosts, and participants, and returns all participants back to the main meeting.
The host or co-hosts can broadcast a message to all breakout rooms. This can be done from the main session or from within a breakout room. Click Broadcast a message to all, enter your message and click Broadcast.
In Conclusion
Breakout Rooms are a great way to open up your Zoom meeting to different techniques and ideas and a great way to expand your toolset for your trainings or In-Services. Like with all things, practice makes perfect, and as always, if you would like further information or assistance with Breakout Rooms in Zoom, please contact your designated Computer Support Specialist.