Preventing Zoom-Bombing
What is Zoom-bombing? Zoom-bombing is a new issue with Zoom
meetings where gate crashers will join meetings already in progress to try and
disrupt the proceedings by sharing viruses, disturbing pornographic images,
and/or violent imagery. Most of the time, this happens when a meeting link is
shared through public communication sources such as social media, but it can
also happen by the perpetrators randomly selecting numbers to join Zoom
meetings and landing in yours.
Reminders on Using Zoom When Hosting Public Meetings
Avoid posting meeting links and Meeting IDs on social media
if possible. E-mailing these links to your clients and participants is a much
more secure method for controlling who you would like to attend.
Avoid using your Personal Meeting ID to host public
events. Always generate random meeting IDs when scheduling meetings. Check here
for more information on scheduling meetings. You can also set it to where the meeting
requires a password to join.
Familiarize yourself with Zoom’s settings and features.
Understand how to protect your virtual space. For example, using the Waiting
Room feature is helpful for controlling your attendees. Check these links
to see the controls
for the Hosts and how to manage
participants during a Zoom meeting.
Manage Screen Sharing
One of the most important things you’ll want to verify is
that screen sharing is limited to hosts only.
In the host controls, click the arrow next to Share Screen and
click Advanced Sharing Options.

Under Who can share? choose Only
Host.
If you have multiple presenters in your meeting, you can set
them to Co-Hosts by opening the Participants window and choosing the
More option next to their name and changing their status to Co-Host.
Manage Your Participants
Enable the Waiting Room when scheduling your meetings.
The Waiting
Room acts as virtual staging area for participants where the Host can let
people into the meeting all at once or one at a time. This is a great way to
control who has access to view your meeting.
Remove unwanted or disruptive participants. From that
Participants menu, you can mouse over a participant’s name, and several
options will appear, including Remove. Click that to kick someone out of
the meeting.
Disable video. Hosts can turn someone’s video off.
This will allow hosts to block unwanted, distracting, or inappropriate gestures
on video or for that time your friend’s inside pocket is the star of the show.
Mute participants. Hosts can mute/unmute individual
participants or all of them at once. Hosts can block unwanted, distracting, or
inappropriate noise from other participants. You can also enable Mute Upon
Entry in your settings to keep the clamor at bay in large meetings.
Create and Distribute Email Newsletters with Microsoft Publisher
I stumbled across a feature of Microsoft Publisher the other day I was not aware of. Publisher is capable of not only creating an email newsletter ( e-newsletter), but it will also send out the newsletter in the body text of your email.
There are a few tips that you will need to be aware of before you try to create and send out your own email newsletter.
- Your newsletter can only be one single page long. That page can be very long in length. However, it will only send out the first page if you have multiple pages in the Publisher file. (On the Page Design tab in Publisher, choose the Page Setup option under the Size drop-down button. This will allow you to manually change the size of the one and only page on your email newsletter. Also, keep in mind that narrow pages work better for cell phones.)
- If you are including multiple photos, be sure to compress all of the images before sending the newsletter. Many email providers will not accept emails that are over a certain size ~20 Megabytes. (You can easily do this for all photos by right-clicking on a photo and choosing Format Picture. Under the Picture tab, select the Compress… button. Change Target Output to Web, choose the apply to all pictures option and click Compress.)
- Be sure to include photos, links or any other items that will make the newsletter stand out.
- Your Microsoft Outlook will need to set up and signed into for Publisher to be able to send your newsletter.
- Before distributing the newsletter, send it to your email and coworkers if possible to check for errors.
- Create a contact group in your Outlook with all contacts who you will send the email to. Outlook contact groups are a great way to easily create and manage email addresses.
- When sending your newsletter, use the BCC (Blind Carbon Copy) option to input email addresses. This will stop the recipients from replying to everyone on the email contact group.
Sending your Newsletter
After you have created, proofed and edited your newsletter, you can start the process to send it.
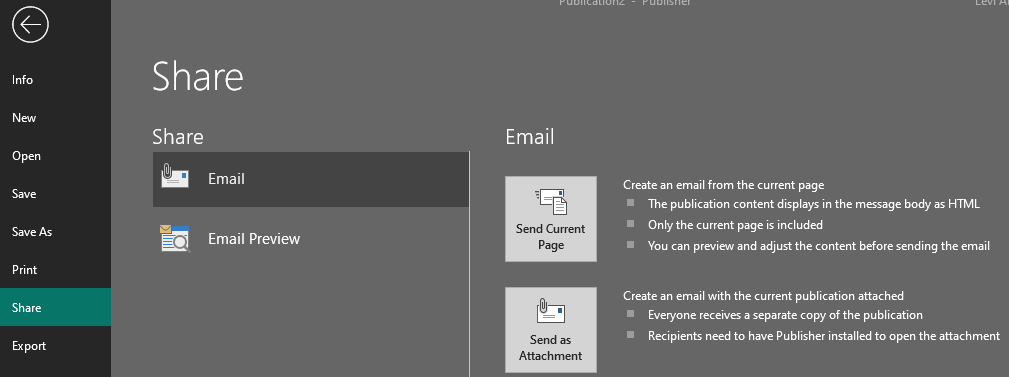
- In your Publisher, click the File button and then select the Share option in the menu. Under the Email section, choose the Send Current Page option. (you will have a chance to view and adjust the newsletter before sending it.)
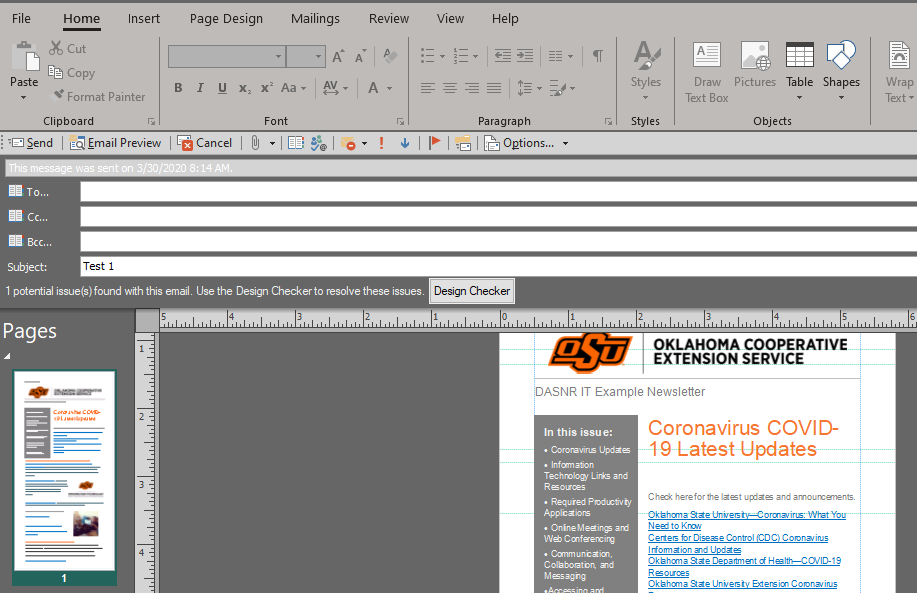
- Enter your email address or contact group that you would like to send your newsletter to. Since this utilizes Outlook for sending emails, you can create and use a contact group to manage who will receive the newsletter. (The To, CC, and BCC buttons open the Outlook address book.)
- Change the Subject line to the title of your newsletter and the date of the current edition. (Example DASNR IT Newsletter: March 2020)
- When all edits are finished, simply click Send and the newsletter will be on its way.
Using Poll Everywhere
Poll Everywhere is an easy way to gather live responses in any venue… conferences, classrooms, webinars, and off-sites — anywhere with internet.
Here is a handy to guide to use when creating new activities and polls.
Cleaning and sanitizing your desktop workspace.
Cleaning your computer can be a hassle. However, a computer keyboard can easily be one of the dirtiest items in your home. Especially if you occasionally eat at your computer or forget to wash your hands before using your computer. With the health risks we are currently facing, it is a good idea to regularly clean your computers and workspaces. The following are simple directions for cleaning and sanitizing your desktop workspace.
1. Turn off and unplug your computer power cables. (If needed, take a photo before unplugging any cables so you will plug them back in the correct ports.)
2. Use a can of compressed air to blow the loose dust and particles off of your keyboard, monitor, and computer case. (Use as directed to ensure no liquid gets on devices.)
3. To disinfect your keyboard and mouse use lightly damp disinfectant wipes and gently scrub down each device. Be sure that liquid does not go into either device as it can cause them to fail. (Never spray anything directly on either device. If needed spray cleaner on a towel to make it slightly damp, then wipe down the devices.)
4. Dust monitor with a microfiber cloth or duster. (If needed, use a lightly damp cloth to dust screen. Use water only. Do not use cleaning products on screen as they can cause damage.)
5. All computer accessories (printers, scanners, speakers, and etc.) use disinfectant wipes only on surfaces that do not contain monitors/screens, scanning beds, or other surfaces that could be damaged by cleaner. On buttons or controls, be sure that no liquid is spilled on or into them as they can damage the components.
6. Use disinfectant wipes to clean all other areas around workspace including desk, chairs, door handles, and etc. (Use as directed to ensure surfaces are not damaged by wipes.)
7. If you are working mobile, use cleaning wiped on the handles and outside of your laptop case as well as anything else with exposure to germs.
8. To clean laptops, make sure they are powered off. Use disinfectant wipes and lightly clean the outside of the laptop as well as the keyboard. Do not use wipes on the screen. (Take special care that liquids are not spilled or dropped into the laptop’s vents or keyboard as they can harm the device.)
9. For cell phones, use disinfectant wipes on the cell phone case and the back of the cell phone. Be cautious around the screen and camera as some wipes could cause damage.
Tips for Working From Home
For those of you thinking about or planning to work from
home, it’s a good idea to make sure your home computer and technology equipment
is updated and safe to use. Whether it’s making you’re your antivirus software
is up to date or verifying your internet service is adequate for hosting or
attending web-meetings, it’s important to be prepared in case of needing to
work remotely. Below, we have compiled a list of resources for you and have
listed some general tips for working securely from home. If you have any
questions, please feel free to contact your Computer Support Specialist or the
university’s helpdesk at helpdesk@okstate.edu
or 405-744-4357.
Great Resources
Department of Information Technology’s Working from Home Information Page includes guides on setting up Remote Desktop and OSU’s Virtual Private Network (VPN), as well as links to guides for Canvas, myOKSTATE, and forwarding your office phone to another number.
DASNR IT’s
Support Portal is DASNR IT’s landing page with links to Contact
Information, Technical Resources, and Cooperative Conversations – In-service
trainings on various tech topics.
Spotlight on
DASNR IT Blog contains articles on various topics including how to stay
safe online and other guides and trainings.
Making Sure Your
Antivirus or Antimalware Software Is up to Date
If you are running Windows 10 at home, make sure the built
in Windows Defender is current and running. You can check for any updates by
opening the Settings app >> Go to Update & Security
>> and clicking on Check for Updates.
It’s also recommended to have a secondary application to run
scans occasionally. DASNR IT recommends Malwarebytes
or Avast.
Downloading the Latest Microsoft Office 365 Software
It’s very important to make sure whichever computer you are using remotely has the latest software available from Microsoft. This guide will help you install the latest version of Microsoft Office 365, which includes Word, Excel, PowerPoint, Outlook, Publisher, and Skype for Business, which is a great tool for communicating with other Faculty or Staff from the university.
Uploading Your Files to the Cloud
It’s a good idea to setup and enable OneDrive using
your university OKEY account. With 1 terabyte of storage space per person, it
will allow you to access your files from any computer or device that has
internet access. Here
is the university’s guide for OneDrive.