National Cybersecurity Awareness Month 2022: Personal Awareness
Cybersecurity Awareness Month is a great time to reflect on your habits and how you interact with technology over the past year. With this, answers to the following questions can help you focus on keeping your online identity and your data safe.
 Internet Security
Have you connected to any public Wi-Fi networks over the last year?
While it is convenient to connect to public networks when at a conference, hotel, restaurant, or coffee shop, it can also be dangerous. If you must connect to the network, avoid doing any banking, online shopping or other online activity you would not like to keep private. Public networks could have users watching, tracking and collecting your activity such as login and banking information.
Have you used any public computers over the last year?
Similar to public Wi-Fi networks, there are risks using publicly-accessible computers. If you log into any secured sites from these computers, your login information could be at risk. For example any site you visit could be listed in the internet browser’s history. If you must use a publicly available computer, ensure that you log out of any sites you previously logged into and when asked, do not store information on the computer. Limit your use on these computers as much as possible.
Have you allowed anyone to use your computer without you being present?
One of the most important parts of security when it comes to technology is acting as a gatekeeper for your technology. People you do not know or do not trust should not have access to your computer or other personal computing devices. If someone is looking to do something nefarious to you, access to your computer will allow them to accomplish their goals. (This is also why it is very important to have a password on your computer.) Even allowing known guests to access your computer could put your system at risk since they could accidentally access sites that install malware on your computer or make online purchases from secure sites where you have stored credit card information.
When was the last time that you purposely updated your computer?
One of the easiest things you can do to help keep your computer, your online identity and your data secure is to simply keep your computer up to date. This doesn’t have to be a huge event where you spend hours a week to ensure that all updates are installed. You simply need to check your computer updates once or twice a month and make sure that they are being installed. Normally Microsoft Windows will install updates without your intervention. However, it will need to be rebooted occasionally and it is a very good idea to check to be sure your updates are being installed. Windows updates can be easily accessed through the setting menu.
Are you talking with your children and other loved ones about computer security?
One thing that can be easily overlooked is ensuring your family knows about computer security. Even when technology is taught in schools, there are some things overlooked or simply not taught. You don’t need to make this a huge deal with your family, but technology and online safety should be considered. If you want to make it a little more fun for younger family members, look online for resources like this video.
Cybersecurity doesn’t need to feel like a huge hassle. Taking a few small steps can make all the difference when it comes to keeping you, your online identity and your data safe.
For additional information on this topic please see the following sites.
1. https://consumer.ftc.gov/articles/how-safely-use-public-wi-fi-networks
2. https://www.nortonlifelockpartner.com/security-center/safety-tips-using-public-computer.html
3. https://privacy.thewaltdisneycompany.com/en/internet-safety/
QR Codes: What are they, what are they good for, and how do you use them?
Even if you do not use QR codes on a regular basis, you have probably seen one over the past few years. Once considered a dead technology, QR codes made a huge comeback during the Covid pandemic.
 QR Code to Wikipedia information
QR codes are square images that allow a smartphone or other device with a camera to open a webpage without typing in the full website address. An easy way to think about QR codes is that they are a more advanced version of a bar code that most stores use. This makes them extremely useful when needing to direct people to a website from a page, flyer, brochure, or even a presentation without needing them to type in a full website address.
While QR codes can be a huge time saver, not everyone knows how to use them. When using them on printed materials, it is a good idea to include directions. The following is an easy example of directions you could include.
How to use the QR code above. On your smartphone, open the camera app and position the QR code in the photo without taking a photo. After a few seconds, a window should open and ask if you would like to open a website. Click on the included link to open the website.
Directions for creating QR codes can be found on our website. (OSU login required.) The directions are also included below.
Outlook Polls: Microsoft Forms plugin
Have you ever needed to ask a group of people a simple quick question and receive their answers in one place instead of individual emails? Microsoft is betting the answer to that question is a resounding YES! They have come up with a simple elegant solution to this widespread problem with “Polls” an Outlook plugin that works directly with Microsoft Forms.
For those of you who are new to Microsoft Forms, it is an Office 365 application that allows you to create, distribute, and collect both quizzes and forms. While it is not quite as powerful of a tool when compared to more feature-rich products like Qualtrics, Forms excels as being a quick and easy solution that can meet many people’s data collection needs. If you would like to learn more about Microsoft Forms, please see our Cooperative Conversation (online training held by DASNR IT) recording.
The new addition of Polls into Microsoft Office allows you to ask one question in an email to one or more people. No, you can not do multiple questions. However, you can always create a complete quiz or form using the Office 365 Forms app. This solution is geared for people who need to ask a single question to a group of people and do it fast!
Before you can start using Polls you will first need to add it to Outlook through the Get Add-ins ribbon option on the Home tab. Simply, click the Get Add-ins button, search for Forms, select the Polls by Microsoft Forms plug-in, and click the add button (image below.)
Once installed, a new Polls button will show in your message ribbon when sending a new email. When you click this button a new side panel will open in the email pane that allows you to create and add a question to your email.
After completing and sending the email, participants will be able to answer the survey either in their Outlook client or by clicking the link that is included with the email. The email is also automatically CCed to you (the sender of the email.)
Once the Poll has been sent and answered, you can view the answers easily by looking at the email that contains the question. You can also open the Office 365 Forms application to see the full results in a graph or to download the information in a .CSV file that you can open with Microsoft Excel.
While this is a very feature-light tool, the addition of Polls to Microsoft can make asking simple questions much easier. At the very least it will record the answers in one place instead of having to sort through emails to compare results. It is a welcome addition to our data gathering toolbox.
Using Social Media Safely
It is easy to ignore cyber security, to not take proactive steps and to think “That won’t happen to me.” Many people, however, have learned – after their accounts have been breached, data compromised and, even worse, their identity stolen – it is much easier to take steps to protect yourself before something happens than deal with the consequences of simply not caring. October is National Cyber Security Awareness month and it is an excellent opportunity to review our social media activity to consider ways we can improve our security and safety.
Being safe online does not have to be a huge hassle – it really only involves one minor item: Think before you take action. In this article I will dive into this theme and highlight steps you can take to better protect yourself while using social media.
Think before you post!
This is always a good recommendation when using social media! Consider these questions before you submit that post.
- Do I need to post this right now or can it wait? Consider how your post may be giving criminals information about your whereabouts, especially when you will be away for an extended time. While you are on a vacation (or anywhere else that is not home), posting photos, status updates, or, even worse, your location could give thieves enough information to know when to break into your home. A much better choice is to wait and share any photos of your dream vacation when you are safely home.
- Am I giving away any of my personal information? You see it on Facebook: funny and fun quizzes begging you to respond. They usually include something along the lines of “here are my answers copy this and repost with your answers.” These usually don’t ask direct questions like “what is your social security number” they usually ask many indirect questions like “what month were you born in”, “what was your high school mascot”, or “what is your mother’s maiden name?” Consider how you use this information with security questions when setting your passwords. Thieves could get enough information about you to reset a password with information from your answers!
- Do I need to post my child’s game schedule? Similar to #1, above, while it can be a great idea to give your children’s schedule to immediate or close family friends, it is probably something you don’t want to potentially share with the whole world. I realize how proud you may be of your child but the safety of your family is more important. Go to the games, have fun, and take photos – just post them at the appropriate time.
- Do I want this post to be online and associated with my name for the rest of time? Even if you delete a post there is a good chance thata copy of it is digitally saved somewhere. It might have been a friend who thought it was funny and took a screen shot or someone with more sinister plans for using it in the future. If you are not sure, wait 24 hours before you post it – enough time to consider if you really want it on the internet.
Think before you click!
When you are on a roll and having fun while on a computer, it is easy to get ahead of yourself and do something you will regret later. This is another great opportunity to take a few seconds to think before you act.
- Do I know this person and should I add them as a friend? Facebook, Twitter, Instagram and other social media applications can be great tools to reunite or stay up-to-date with friends and family from all over the world. It is also very easy to accept invitations from almost anyone as a friend – even if you do not know them. It is really easy to click that “Accept” button especially when they might already be friends with some of your current contacts. A really good rule of thumb: if you don’t know someone in person, don’t add them on social media.
- Do I really need to click on the link in this post to find out my horoscope, watch a video or play that online game? While it is a very simple to click on a link posted by one of your friends, it can also be dangerous: your computer could get a browser hijack or the link could download malicious software to your computer. When this happens, it is not always as easy as rebooting your computer or uninstalling a program to make a computer problem go away. Ransomware is an example: Clicking the link may result in all the data on your computer becoming encrypted and potentially lost.
Think about security!
Last but probably most importantly, take some time to review the security of your social media security settings. Are your posts visible to just your friends on Social Media or are they viewable by everyone in the world? Is your birthday, anniversary and other important personal information available to everyone or just your friends?

Social media and cyber security
Social media is a great and useful tool but we should use it safely and think about how our actions affects our safety and security. Cyber Security Awareness Month gives us the opportunity to think and to make the needed adjustments to better protect not only ourselves but safely communicate with the people we love.
Links for more information
- https://cybersecurity.ok.gov/content/think-you-click-staying-safe-social-media
- https://www.cisa.gov/sites/default/files/publications/NCSAM_SocialMediaCybersecurity_2020.pdf
- https://home.sophos.com/en-us/security-news/2020/social-media-and-cybersecurity.aspx
- https://blog.hootsuite.com/social-media-security-for-business/
Zoom – How to change your username
Security has become a very important component of holding a Zoom meeting. The ever-present risk of having a meeting Zoom Bombed has created the need for people to increase security for meetings. Due to this, people who are not known or who have the default username of “User” may not be admitted into meetings. Because of this, it may be necessary to change your username before joining a meeting and it is generally a good recommendation.
How to change your username before or during a Zoom meeting.
- Sign in to Zoom using your credentials.
At this point, you should already have Zoom installed on your computer. (Link to Zoom Download.) From the start menu, locate and open the Zoom client. If you have previously created a Zoom account or your work/school has provided Zoom accounts, sign in with that information. This will change the default “User” to your name which is registered with Zoom. (OSU employees can use the SSO option.)
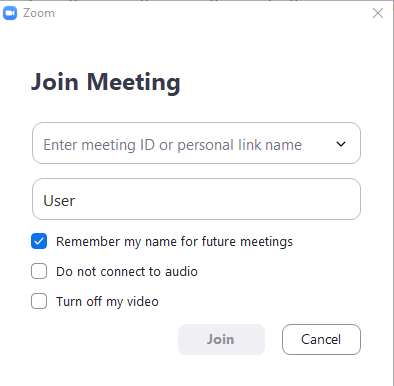
- Change your username before joining a meeting.
You can change your username before joining a Zoom meeting. However, it is best to do this before clicking a hyperlink to join a meeting from an email or website. Find and open the Zoom meeting client in the start menu of your computer. Click the “Join a Meeting” option from the client. Delete the default username “User” and enter your first and last name. Paste the meeting ID information into the window that was provided for the meeting and then click the “Join” button. This will save your username for future meetings allowing you to join meetings by simply clicking on the link from emails.
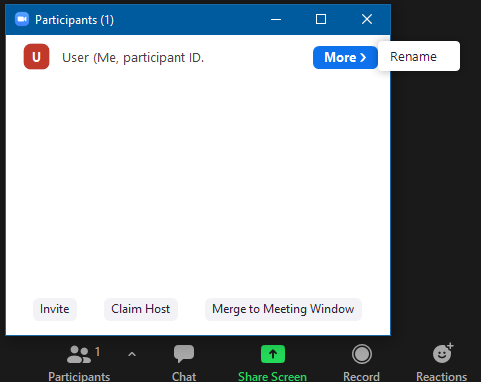
- Change your username after joining a meeting.
If you have already joined a meeting and your username is listed as “User” you can change it from the Participants menu. Simply click the Participants button at the bottom of the screen. Mouse over your name, click the “More” button, and choose the rename option. This will allow you to change your username and make it easier for people to know who you are and how to interact with you. Editing your username in a session will only change it for the current session and will not default it as your new username. Steps one and two are preferred as they will save your username for future meetings.
Zoom Security: Updates
When you are hosting a Zoom meeting, security is essential to the success of your meeting. Zoom has become one of the most popular online conferencing tools in use today. Along with the rise in popularity, comes an increase in security risks. One of the biggest problems currently is Zoom-Bombing which is when a group of people tries to take over or disrupt a current Zoom session. In an effort to combat these security risks, Zoom has updated and added additional security features. For additional information, see our Zoom security best practices guide.
Zoom Security menu
Zoom has expanded the former security menu to include additional items. You have control over every aspect of what participants can do when they are in your Zoom session. If you need some to Share Screen or Unmute themselves without giving that feature to all participants, simply promote them to a cohost in the Participants menu. Also, if your meeting is breached or participants become unruly, use the Suspend Participant Activities option in the Security menu. This will remove all options from this list and promptly mute everyone and turn off their cameras. Once this has been selected, only the host or co-hosts can unmute themselves and turn on their video.
Removing Participants
From the Zoom Security menu, you can remove participants. When you click the Remove Participant option from the security menu, you will see the window shown above. From this list of participants, you can click remove on individual participants. Note – be sure to lock the meeting before removing any participants or they may be able to rejoin.
Reporting Participants
Zoom has also created a reporting option for unruly or unwanted guests. This service allows you to report a user including video or screenshots of their bad activity. When submitted, the information will be sent to a review and if deemed unacceptable the user will be blocked from using Zoom in the future. This should only be used in cases where the user is intentionally disrupting Zoom sessions.
Zoom: updating your desktop client for Windows
It is a good idea to keep software that you use frequently up-to-date on your computer. Up-to-date software provides several benefits including fixing issues from previous versions, patching security issues within the software, and installing new beneficial features.
Directions for updating Zoom Windows client.
The first thing you will need to do is open the Zoom client from the Windows Start menu on your computer. If you do not have the Zoom client installed, you can install it from here.
If you are not currently signed in to Zoom, you will be required to sign in before you can start the update process. OSU employees can use their OKEY login using the SSO option. (Directions for this process available here.)
Once you are signed in, click on your initials in the top right corner of the Zoom window. (If you have updated your profile with an image, this could show your image instead of your initials.) Then select Check for Updates from the settings list.
The Zoom client will check for updates and show any available updates it will find.
Once it has finished checking for update, select the option to begin the zoom update. Zoom will update the client and restart when it is completed.
Cybersecurity 2020: Safeguard Your Data
Why should you care?
How would you feel if you walked into your office tomorrow and your computer was gone? Does your physical and emotional state worsen if you realize all your data that you accumulated over the years was suddenly ripped out of your hands? Even worse, what if the data now in the possession of the thief contained your account information from banks and credit cards, and the personal information could allow them to steal your identity? If you are like me those thoughts put a knot in your stomach and make you realize how important it is to keep your data safe.
How can you prevent this from happening?
I bet you want me to tell you the one thing you can do to make your computer and your data safe! Unfortunately, there is no one thing you can do to completely protect yourself and your data. Thefts happen, computer hard drives fail, flash drives get lost or put through the washing machine, and even secure websites occasionally get breached exposing secure data. That doesn’t mean you should give up and not do anything. Instead, you should take steps, however small or insignificant they may seem, to protect your data. These small steps when put together will provide you with better data security than one fix-all solution (if it actually existed.)
Steps to help safeguard your data.
1. Use passwords on your devices. This is a very simple step that can create a huge stumbling block to anyone who would like to access your data. If you do not have a password on your computer, laptop, or phone anyone can simply walk up to it and have instant access to anything on your device. Passwords don’t have to be huge monstrosities that you have to write down to remember. Think of a word or phrase that is important to you and that would not be easy for others to guess. Even using a simple password is better than not using a password at all. Read more about passwords in this blog post.
2. Make sure you have your data backed up on to more than one device. Having all of your data on one device whether that is a flash drive, computer, or hard drive is never a good idea. All electronic devices have a limited lifespan and can have issues or even completely fail. If you have all your data saved only to one device, you are just asking for trouble. One of the best solutions is to backup your data online. This protects you from most vulnerabilities that would leave you with no data– yes even tornadoes and fires! OneDrive is a good tool for backing up documents and this blog post provide more information.
3. Protect your devices like your identity depends on it — because it does! When on trips, dining out, or even at work, never leave your devices unattended or in plain sight in your car. Technology is one of the most targeted thefts in the world today. If you have purchased a new phone, laptop, or tablet lately you probably noticed the prices are higher than the last time your purchased the same technology. This makes them an easy target especially if you leave your laptop or phone on your table in the coffee shop as you quickly run for a refill or to the restroom. Don’t assume your devices are safe. Read more about cybersecurity and your personal devices at this blog post.
4. Use Multi-Factor Authentication (MFA) on important accounts. OSU is in the process of implementing MFA for all employees. MFA is a security measure that decreases the likelihood someone other than you can log in and steal your data. Yes, this extra step to use your device or online account can make it a little more difficult. It also makes it almost impossible for anyone other than you to get access to your data and access your personal accounts – which is the entire point of MFA!
5. Finally, be suspicious of items that do not look or feel quite right. If someone emails or calls you claiming to be from OSU Information Technology and needs you to verify your account, it is fake. OSU IT already knows your information because it is configured on the servers. If you receive a phone call or email with misspellings, bad grammar or odd phrases, it most likely is not who they claim to be. When this happens, safeguard your information by not giving it out or clicking links in your email. (More information about phishing in a previous blog post.)
Zoom: troubleshooting speakers, microphones, and Cameras.
Hosting zoom meetings can be a challenge when working with a group or even by yourself on a computer that has more than one microphone, camera, or set of speakers. However, programmers at Zoom have created an easy way to easily change each of these sources. In the following list, I will show how you can change each one of these settings and finally show how to test your configuration to ensure it is working correctly.
1. Camera Settings
When you are in a Zoom meeting, you can easily change which camera is being used. To do this simply click on the small up arrow in the corner of the Start/Stop Video button. This will open a menu that allows you to change the current camera. If the camera you would like to use is not shown on the list, it most likely is not fully connected or installed on your computer. Check the camera’s connection to the computer and ensure the power cable is plugged in if the camera requires one. Feel free to change the camera to see which one offers better video. Not all cameras have the same resolution and some situations could require purchasing a camera with higher resolution or more advanced options.
2. Microphone and Speaker Settings
The microphone and speaker settings can be accessed in a similar way to the video settings, simply click the up arrow on the Mute/Unmute button. In these settings, there are sections for selecting a speaker and a microphone. Each of these sections will show the available devices you can use for your speakers or microphone. If a device does not show in the list, check it’s connection cable or Bluetooth settings to be sure it is connected correctly.
3. Test Speakers and Microphone
If you are having issues with your speakers and microphone or if you would like to test them before a meeting, there is a built-in test in the speaker and microphone settings. This test will play sound through your speakers and test your microphone by having you speak then playing the recording back to you. If you are not sure which devices to use or having issues with a device, this is an easy way to ensure your settings are correct.
4. Other considerations and fixes
A. If you continue experiencing issues even after troubleshooting your devices, you might be having internet connection issues in Zoom. Zoom may alert you buy either changing the resolution of your video stream or displaying the following message “Your Internet Connection is Unstable.” If this is the case, you will need to use a better internet connection. If you are using wireless, simply make sure your connection is as strong as possible. Certain rooms and locations may have interference or may block your wireless internet connection. To alleviate this, try different rooms to ensure you have the strongest connection possible.
B. If you are using a Bluetooth microphone and experiencing distorted audio, remove any devices in between the microphone and the computer it is connected to. Phones, laptops, and other devices that have Bluetooth enabled may cause interference and produce distortions in the audio. If that does not fix the issue, move the microphone closer to the computer to strengthen the Bluetooth signal.
C. You may need to use a mixture of devices for group meetings. We highly recommend using Bluetooth microphones for meetings as they can better pick up a group conversation. However, the included speakers in those devices may not be loud enough for a group. In this case, we would recommend using a louder set of speakers for instance a televisions speakers if you are using one to display the video.
D. If you are experiencing issues with your webcam using a virtual background, you may need to try a different webcam or simply not use the virtual background feature. Not all webcams are suitable for use with virtual backgrounds. Many low-quality cameras experience problems due to low resolutions. If this is the case, try a different webcam or simply turn off the virtual background.
Zoom: using a second camera for document/activity feed
Have you ever needed to share live video in Zoom that is not your current webcam? Whether you are needing to use this as a document camera, an activity camera, or a demonstration camera, Zoom has a built-in screen share feature that allows you to do just that.
Before you can start using this feature you will need to have a second camera attached to your computer. While more powerful cameras will give a clearer image, this feature does not require anything more powerful than a standard webcam. Also, there is no setup required other than camera placement.
To start using this feature, attach both cameras to your computer and start your Zoom session. Then make sure that your default camera is correct. It should be facing you with the secondary camera facing the item/activity/people to be shared. Click the Share Screen button in the Zoom Menu. After it opens, select the Advanced share menu option at the top of the window. Select the Content from 2nd Camera option and click the share button. (displayed below.)
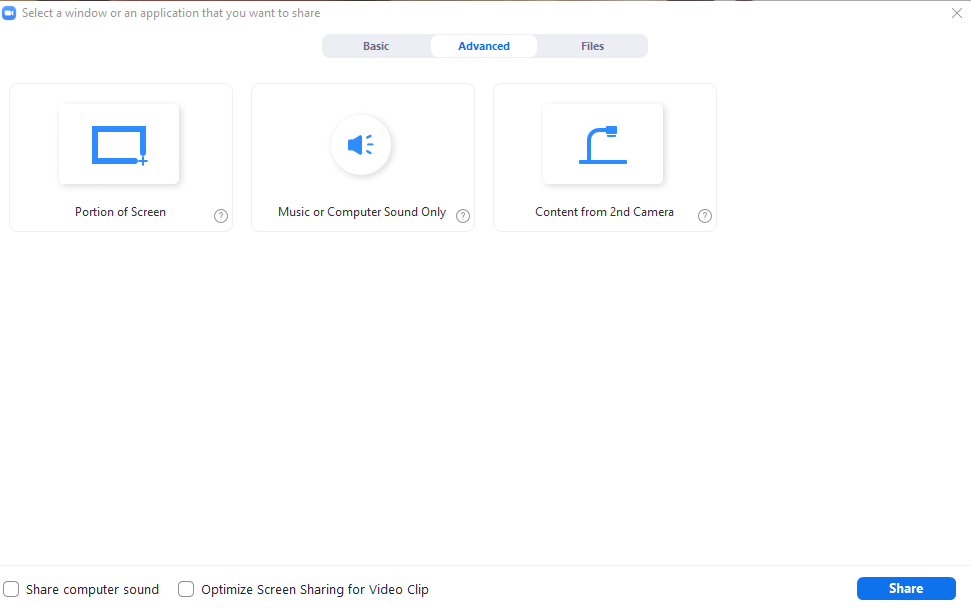 Advanced sharing options from Zoom session.
This will share the second camera as the main content item and show a small set of speaker windows in the top right of the screen. The attendees will be able to watch the speaker while they are speaking and see the display of the 2nd camera at the same time. (example below.)
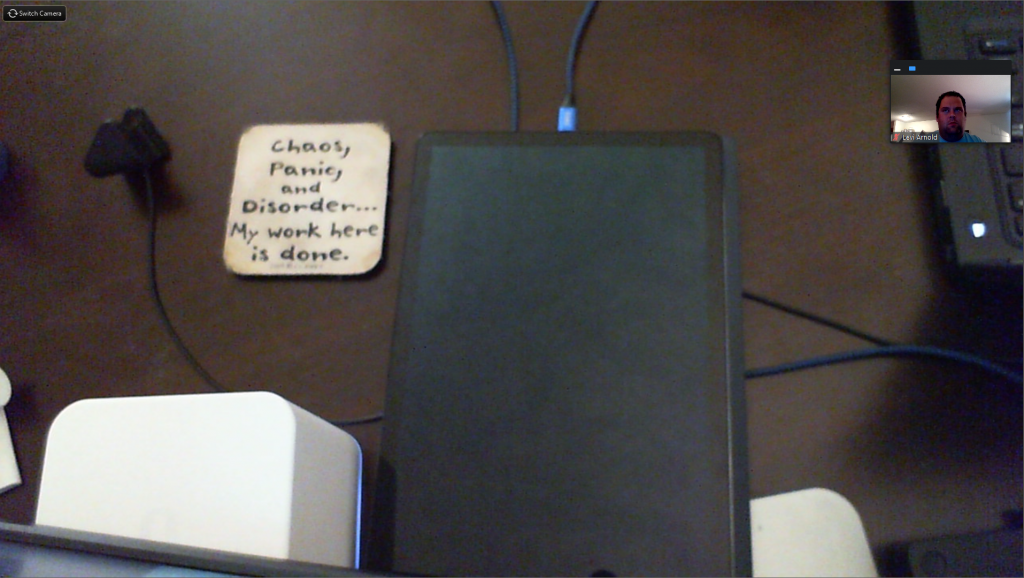 Video feed from 2nd camera while in Zoom session